A letter you never want to receive...
Tuesday, May 29, 2012
Wednesday, May 23, 2012
Tuesday, May 22, 2012
Monday, May 21, 2012
Friday, May 18, 2012
Day 6/10: Motion
Day 6/10: Motion. We had to do a photo involving something moving. I had some help and got a 'Bourne Ultimatum' style picture.
Thursday, May 17, 2012
Day 5/10: Scrambled Bodies
Day 5/10: Mixed Up Bodies. My mixed up body is a face of some random kid that I made his face small.
Tuesday, May 15, 2012
Monday, May 14, 2012
Friday, May 11, 2012
Day 2/10: Superhero Mixup
On the second of twelve days, we had to make a "Superhero Mixup". I made Super Woody! His power is that he has woodland friends to aid him in the fight against crime.
Thursday, May 10, 2012
Day 1/10: Sliced
Day 1 of the 10 day countdown! This one is called Sliced. I chose a panda and I made a checkerboard what is inside him.
Tuesday, April 24, 2012
Fish Parts
My Fish Parts Project, made with blue and green neon. The eye is made of coins and a black gemstone.
Thursday, April 12, 2012
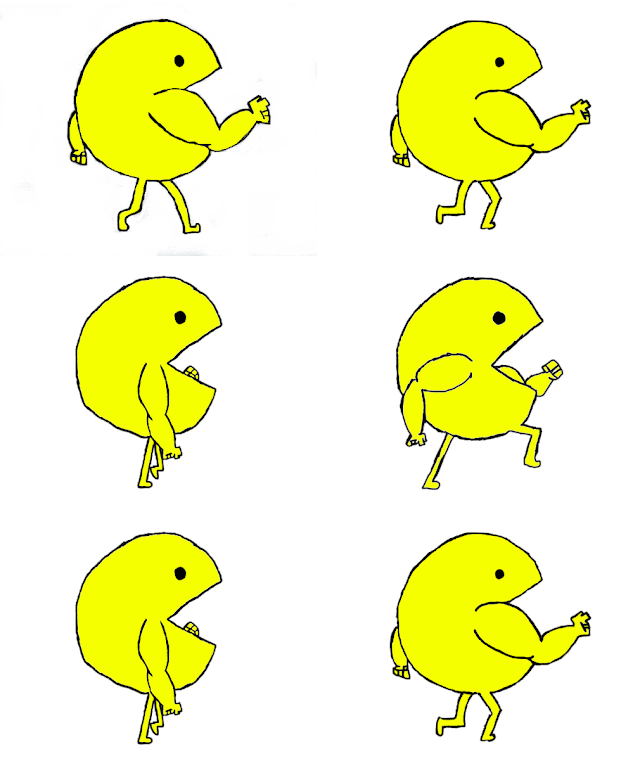
Walk Cycle
This is my Pac-Man walk cycle, which is a little screwy. Not sure what happened but I am still happy I made something animated!
Friday, March 23, 2012
Box Pictures
These are the front and back pictures for the box "Four Arms" will be in. They followed a general color scheme of bright green, lavender, and orange.
Thursday, March 22, 2012
Four Arms
My finished picture of the monster named "Four Arms'. The original drawing was done by a kindergartener, and I had to interpret it and put it into Photoshop. I am pleased with the final result.
Tuesday, March 13, 2012
Tyga Last King Typography
This is my "Tyga Last King Typography" picture. It took me four days to complete and I am Very satisfied with the results of the picture. The hardest part was the eyes/eyebrow and the easiest was the outline of his neck and shoulders.
Monday, February 27, 2012
Individual Projects, 3D Alien and Lightning
These are two of my individual projects not related to the class. They were tutorials and I am happy with the way they look. The alien is also 3D but I am not sure if the 3D effects actually work.
Wiz Manga
This is my Manga piece. The biggest problem with this piece was getting his mouth to become smaller without distorting it too badly. I am pleased with the results especially after all the setbacks that occurred when I was doing it.
Wednesday, February 22, 2012
Retouch number 2
This is my second retouch picture, this was a lot harder than the first one. I am not sure why it was harder but the final outcome is mediocre at best.
Wednesday, February 15, 2012
Blemish Girl
This is the before picture of the "Blemish Girl"
This is the after of the "Blemish Girl". I learned how magazines and other publications retouch their photos. I learned how to use the "spot healing brush", and the "patch tool". Everything I did in this picture worked very well and I am pleased with the final results.
Friday, February 10, 2012
Lion Splat
This is my "Lion Splat" piece. This project was very time consuming and very detail orientated. The longest and hardest part was getting the paint splats cut out. Once I got the paint cut out, I had to cut the lion out of the background and get a copy of the lion. Then, I duplicated the lion and then I erased his back half, put the sp;at on him then merged the two layers. I then had to drag the combined lion and paint back onto the original background. Then I repainted the spaces over the lion and made them look like the sky. I am happy with the final results, especially after all the time it took. If I could change anything, I would choose a different paint splat and probably a new animal.
Wednesday, February 8, 2012
Baseball Color Wheel
This is my "Baseball Color Wheel" piece. The colors are the colors from an RGB color wheel, the RGB stands for Red, Green, and Blue. Which is different from the standard RYB color wheel used in painting, coloring, etc. I am satisfied with my results especially after all the trial and error I had already done before finalizing this picture. What didn't work was basically my entire first picture, because I used a photo that was shiny, so when I colored the item, only the edges would color, and the object was an irregular shape so it didn't make a very good circle. What did work was getting a mainly white object, my baseball, and coloring that to make a successful color wheel. I would definitely choose a white object that colors easily if I were to redo this project. The most difficult part of this project was getting the inner and outer glows of every baseball to be uniform, I was trying to achieve a perfect outer glow, and I'm very happy with how it turned out. I learned about the RGB color wheel and what you get when you combine certain colors in Photoshop.
Monday, February 6, 2012
Space
This is my picture of outer space. I enjoyed creating this piece, although it was a difficult piece. I am satisfied with the results of it. What didn't work, at first, was getting the cloud effect to be colorful but I just had to play with the layers a little bit to get the effect I wanted. If I were to redo this project I wouldn't change anything about it. The most difficult part of this project had to have been getting the color effects on everything in the picture to be uniform. I learned that making multiple layers and adding blur effects to a picture can really make it look a lot better.
Thursday, February 2, 2012
Colorized
This is my "Colorized" picture. This is a very simple process with extremely satisfying results, everything worked and i had no trouble at all. I learned how to put colors under a picture and how to blend those colors to less sharp, and have a blurred effect.
Beached Pig
This is my "Beached Pig". I am very happy with how it turned out because of how difficult this assignment was. It was difficult because I couldn't figure out which two animals would look good if they were combined. I tried a polar bear and a cat, and a panda with a tiger, but those combinantions just didn't work. The hardest thing with this was getting the head and the body to morph together without it being noticed. I had to use the clone stamp tool, eraser tool, brush tool, just to get the head and body look like they belong together. What did work about this assignment was cutting out the pig's head from the original picture it came from. I learned how to make two different animals blend together.
Monday, January 30, 2012
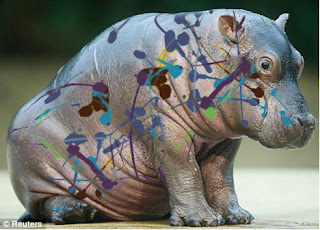
Hippo Splat
This is my "Hippo Splat" picture. I am happy with how this piece turned out. Things that worked for me was the warp feature and the eraser worked well too. Nothing gave me any trouble in terms of working well. There wasn't any terribly difficult parts of this project. The only thing I would change is the animal and the pattern I use, other than that I would not change anything. I learned how to use the warp tool efficiently.
Friday, January 27, 2012
Clones
This is my "Clones" picture. I feel successful with this picture. Everything about this picture worked out very well. If I could redo this project I'd take a few more photos, and change my pose. There wasn't anything difficult about this piece, it was fairly easy to do. I learned how to turn multiple photos into one photo.
Pancake Mouth
This is my "Pancake Mouth". I am satisfied with how this piece turned out, especially since it was the first time I ever used PS. What worked with this piece is that I got the mouth to fit and the edges of the mouth don't look too distorted. What didn't work is that I didn't get the exact hue of the mouth I wanted, but I got it pretty close. I would change how I got the mouth itself to open, because I distorted it too much. The most difficult part of this project was getting the mouth to open and get it the right size. I learned how to use the liquify tool correctly during this project.
Frog Tongue
This is my final copy of my "Frog Tongue". I am very pleased with how it turned out. I am pleased because this was a very challenging thing to do. What worked for me was the shadow effect on the frog and when I successfully cropped out the frog onto the girl's face. What didn't work, at first, was getting the tongue onto the frog and not getting the teeth or lips. I would change the animal just to see how it looks. The most difficult part of this project was getting the frog to get the tongue texture. I learned how to crop and put an image on another image, I also learned how to copy textures from one surface to another.
Subscribe to:
Posts (Atom)


.jpg)
.jpg)


.jpg)

.jpg)

.jpg)


